
Homeschool storage ideas work best when every item has an owner: the child, the parent or the back-stock shelf. Our homeschool learning zones guide is an overview of setting up learning zones at home. This article covers one part of it, the storage system for books, supplies, manipulatives, projects and less-used back-stock. Many households face that job: 5.4% of U.S. children were reported to be homeschooled in 2020-211. Each of those homes holds a school’s worth of materials without a school’s supply closet.
Quick Answer
How do you organize homeschool storage for books, supplies and back-stock?
Sort every item into four tiers by how often it is used, then give children the middle shelves and parents the high shelves and cabinets. U.S. Access Board guidance for public buildings puts the forward reach of children ages 5 through 8 at 18 to 40 inches2, a useful band for daily materials. Anchor tall units, keep paper back-stock out of damp spaces, and write overflow rules before buying more bins.
Key Takeaways
- Sort materials by how often they are used, not by subject: active, on-deck, back-stock and archive. The tier decides the shelf.
- Put this week’s materials inside the child’s reach. For public buildings, the Access Board gives ages 5 through 8 a reach range of 18 to 40 inches2, a reference band rather than a home rule.
- Anchor every tall shelf. An average of 18,673 children a year were treated in U.S. emergency departments for furniture or TV tip-overs from 1990 to 20194.
- Keep surplus and hazardous supplies adult-managed, in line with CPSC art-safety guidance to store surplus materials away from children6.
- Store paper back-stock in the living area, not a damp basement or hot attic7. The EPA suggests keeping indoor humidity below 60% where possible8.
Before You Start: What a Homeschool Storage System Needs
A homeschool storage system needs an inventory, a map of who uses what and a measured wall before any bin is bought. Observation before shopping saves money, because containers bought first tend to decide the categories instead of serving them. Gather these first:
- A one-week use log listing every book, tool and supply touched on each school day, plus what sat untouched.
- A user list with each child’s age, the materials each one uses alone, and the materials that need an adult.
- A tape measure and a stud finder for every wall that will hold shelving, a pegboard or an anchor strap.
- Plain labels and a marker, because every container gets a name before it gets a home.
- Time: one weekend to sort and one to build, with any wall cabinet or heavy shelf checked by a licensed installer.
The room as a system frames every step. Storage is not a side project next to the school day: it decides how fast a lesson starts and how fast the room resets when the lesson ends.
Step 1: Sort Every Item Into Four Storage Tiers
Step 1 gives every book, supply and project a tier based on how often it is used, so the shelf follows the schedule instead of the subject. One likely source of homeschool clutter is mixed tiers: next term’s workbooks sit beside today’s, and the child has to dig past both to start a lesson.
A storage tier is a group of materials that share a use frequency, and therefore share a location and a manager. Four tiers cover almost everything a home school owns.
| Tier | What it holds | Where it lives | Who manages it |
|---|---|---|---|
| Active | This week’s books and workbooks, pencils, the current manipulative set | Inside the child’s reach, near the work surface | Child |
| On-deck | The next unit’s books, refill paper, the next manipulative set | Just above the child’s reach, or the lower shelf of the cart | Parent |
| Back-stock | Next term’s curriculum, bulk supplies, spare workbooks | Closed bins on a high shelf, or heavy bins on the floor row | Parent |
| Archive | Finished work samples, records, curriculum kept for a younger sibling | Labeled document boxes in the living area | Parent |
- Empty one subject at a time onto a table, so the sort stays manageable.
- Check each item against the use log and give it a tier.
- Put a sticky note with the tier name on each pile before anything goes back on a shelf.
- Remove anything with no tier: duplicates, dried-out markers, and outgrown books with no younger sibling waiting for them.
The step is finished when every item carries a tier and each child’s active pile fits in a single shelf section. When the active pile is larger than that, some of it belongs on-deck.
Sort by frequency before subject, because a shelf organized only by subject still asks a child to search through months of material to find today’s page.
Step 2: Split Child-Accessible and Adult-Managed Storage
Step 2 places the active tier where children can reach it without help and puts the other three tiers under adult control. This split lets a child start and finish a lesson independently, while the parent keeps control of quantities, sharp tools and surplus.
Child-accessible storage is any shelf, bin or drawer a child can open, reach and return without climbing or calling an adult. Adult-managed storage is everything above that band or behind a latch, filled and emptied by a parent.
Accessibility standards for public buildings tie storage to reach. Section 811.3 of the ADA Standards says storage elements shall comply with at least one of the reach ranges in section 3082. For children, the reach ranges sit in Advisory 308.1 of the same standards. Ages 3 and 4 reach from 20 to 36 inches, and ages 5 through 8 from 18 to 40 inches2. Ages 9 through 12 reach from 16 to 44 inches2. Homes are not bound by these rules, but the bands are a sound place to start measuring.
What belongs on the child’s shelves?
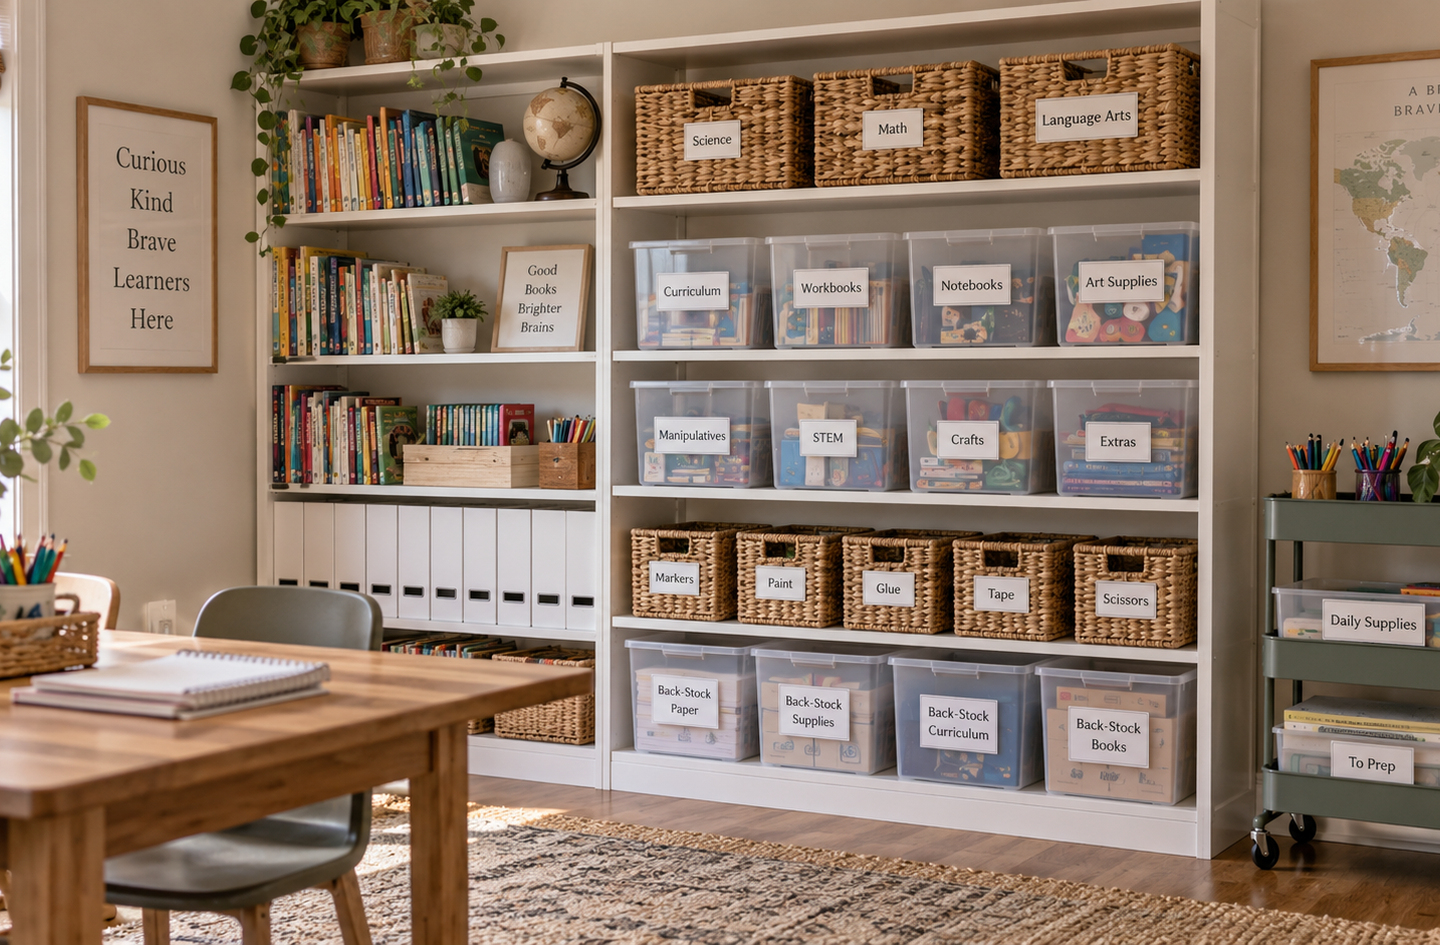
The child’s shelves hold the active tier and nothing else. Readers stand cover-out in a shallow rack, and workbooks sit upright in one magazine file per child. The current manipulative set lives in a lidded bin with a picture label. Labels in words and pictures let a pre-reader return materials alone, which is the whole point of the band.
What stays adult-managed?
Surplus supplies, refills, sharp tools and anything with small or loose parts stay above the child’s reach. CPSC guidance on art materials says to store surplus materials away from children and to give only small amounts to minimize spills and mishaps6. In practice, the child’s shelf gets one glue stick and the back-stock bin holds the other eleven.
Magnetic manipulatives deserve the same care. CPSC estimated 26,600 emergency-department-treated magnet ingestions from 2010 through 20215. Its 2022 magnet rule covers products made for entertainment, jewelry, mental stimulation or stress relief5, so it may not cover every magnetic manipulative.
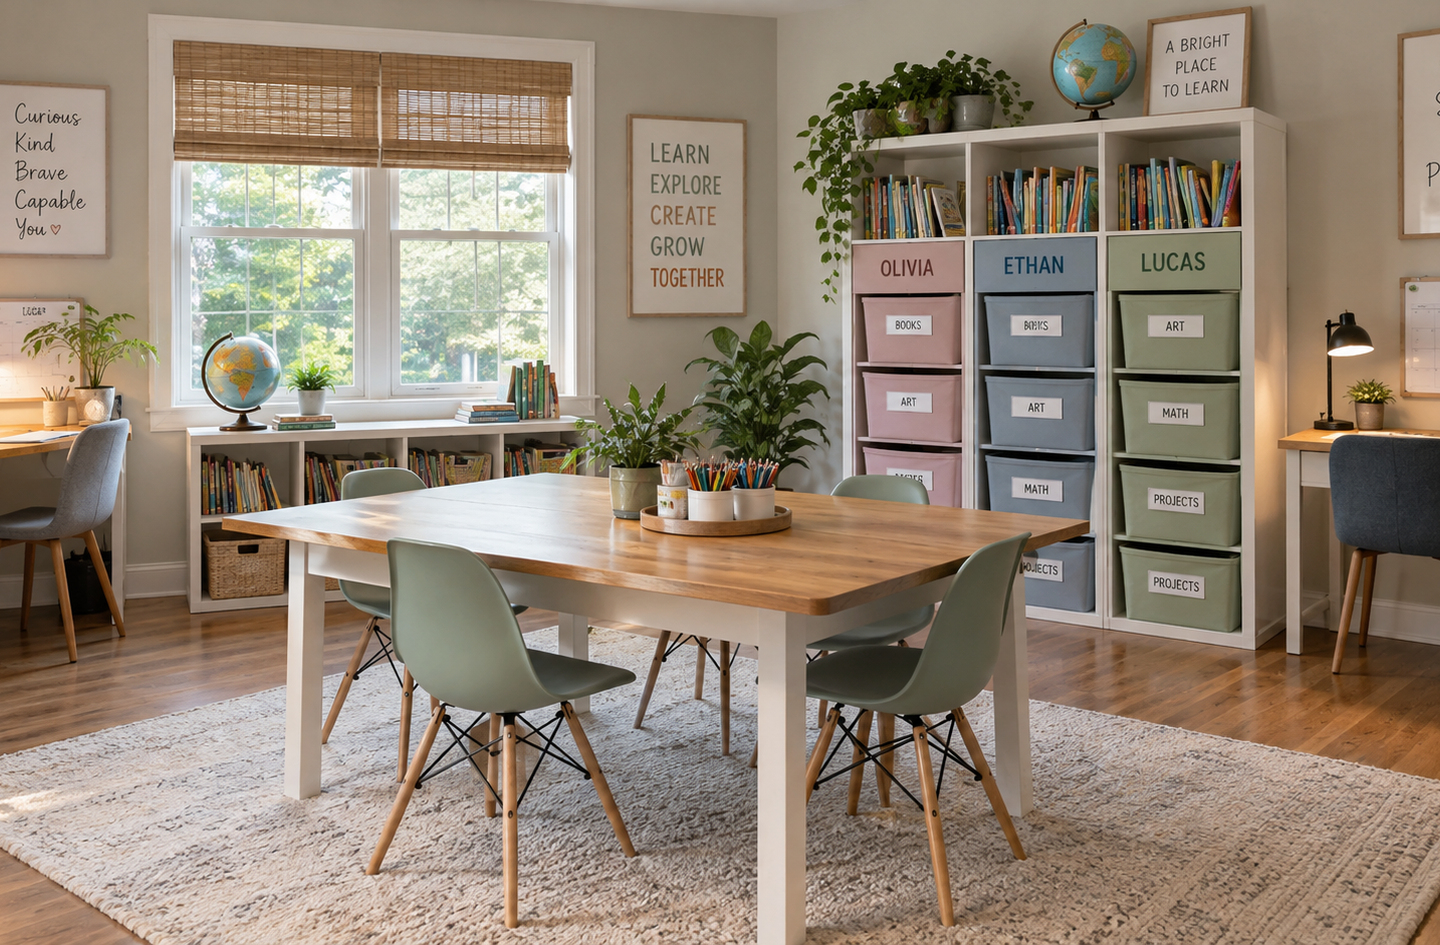
Verify the split by asking each child to fetch and return three active-tier items alone. If anyone climbs, stretches onto a chair or asks for help, move those items down a shelf.
Give the child’s shelves only what the child should use alone, because a shelf within reach works as an invitation, whatever its label says.
Step 3: Build Vertical Shelving and Anchor It
Step 3 moves storage up the wall, with the heaviest loads at the bottom and every tall unit tied to the wall framing. Wall height is often unused space, and homeschool book storage needs plenty of it, because curriculum, readers and reference books add weight quickly.
Tall shelving also raises a stability question. National emergency department data estimate an average of 18,673 children a year treated for furniture or TV tip-over injuries from 1990 to 20194. Children under 6 made up 69.9% of those injuries4, and homeschool families with toddlers and older students under one roof need to plan for the youngest climber.
The federal tip-over rule targets clothing storage units. It tests units 27 inches and above in height with weights that simulate children up to 60 pounds3. The voluntary standard it builds on does not cover shelving units such as bookcases3.
A tip-over restraint is a strap, bracket or cable that ties the top of a furniture unit to the wall framing to reduce the chance that the unit pitches forward. Fix it into studs, not drywall alone, and have a licensed installer evaluate plaster, brick or any wall where the studs fall in the wrong place.
How should books and bins be stacked?
Load each unit from the bottom up. Boxed curriculum and reams of paper go on the floor row in closed bins, where they lower the unit’s center of gravity. They also spare the parent a lift from overhead. CPSC applies a similar idea to hazardous chemicals, advising large containers below shoulder height to minimize falls and drops6. Light back-stock, like spare folders or seasonal craft paper, can go above the child’s reach.
Where do wall shelves and pegboards fit?
Wall-mounted shelves suit hallways and narrow rooms where a floor unit would block the path. Pegboards suit tools that children use daily, like rulers, scissors in a sheath and hole punches, because every outline shows where each one returns. Both carry loads into the wall, so the fixings matter more than the shelf, and a licensed installer should confirm them on older walls.
Verify the step by pushing gently on the top corner of each loaded unit. Any rocking means the anchor or the floor needs attention before children use the shelf. A push test does not replace the shelf’s load rating or an installer’s check.
Anchor the shelf on the day it goes up, not after it fills, because a loaded, unanchored unit can tip when a child climbs it.
Step 4: Set Up a Homeschool Rolling Cart for Daily Materials
Step 4 adds a rolling cart that carries the active tier between the shelf and the work surface. A homeschool rolling cart turns the daily reset into one trip. Load it in the morning, roll it to the table, and park it against the wall when school ends.
- Top tray: pencils, erasers, a ruler and child scissors, split by child if siblings share the cart.
- Middle tray: today’s books and workbooks, standing upright in the order they will be used.
- Bottom tray: the heaviest items and the project in progress, which keeps the cart steady when it rolls.
- Labels: one per tray, in words and pictures, so a child can reload the cart from the shelf alone.
Give the cart a parking spot outside the walking route. U.S. Access Board standards for public buildings set the clear width of walking surfaces at 36 inches minimum2. That figure is a useful target for the path past a parked cart in a home. Lock the casters whenever the cart is parked, and keep the rule that the cart carries books, not children.
When school moves between the kitchen, the living room and the floor, the portable homeschool system spoke covers carts and caddies that travel between rooms.
Verify the cart by timing the morning load and the afternoon unload for one week. If either takes longer than a few minutes, the cart holds on-deck material that belongs back on the shelf.
Treat the cart as the active tier on wheels, and nothing more, because a cart that holds everything becomes a second shelf that never resets.
Step 5: Use a Homeschool Storage Cabinet for Adult-Managed Supplies
Step 5 puts the supplies children should not use freely behind doors: paints and glues in bulk, solvents, sharp tools, refills and kits with small parts. A homeschool storage cabinet does two jobs at once, because it controls access and also hides a wall of color and packaging from the work area.
CPSC’s art-safety guide gives a clear set of storage habits for hazardous materials. It advises storing toxic materials in a locked cabinet, avoiding food containers for storage, and never removing or defacing a manufacturer’s label6. Its broadest rule fits any homeschool supply closet:
“Never store any material that you are not prepared to control if it spills.”
U.S. Consumer Product Safety Commission, Art and Craft Safety Guide6
Which supplies go behind a latch?
Anything with a cautionary label, anything sharp, anything with loose magnets or small parts, and every bulk refill goes behind the latch. Washable crayons and pencils can stay on the child’s shelf. A homeschool organization cabinet with adjustable shelves lets the parent group these by subject, so a science kit and its refills sit together.
Where should a wall cabinet hang?
A wall cabinet above a walkway brings a different risk: an open door or a deep box at head height. In public buildings, objects with leading edges more than 27 inches and not more than 80 inches above the floor must protrude 4 inches maximum into the circulation path2. In a home, the simpler fix is to hang wall cabinets over a desk or counter, never over the route children walk.
Verify the cabinet by checking that every container inside still carries its original label, and that the latch works with one adult hand.
Lock up by hazard, not by value, because the costly supplies are rarely the risky ones, and a cabinet sorted by price leaves the wrong items within reach.
Step 6: Store Back-Stock Where Paper Lasts
Step 6 finds a home for back-stock and archive boxes inside the living area, where temperature and humidity stay moderate. Paper curriculum, reams and workbooks make up much of a home school’s back-stock, and paper reacts badly to damp and heat.
The National Archives gives three numbers for storing family papers. It advises keeping the temperature below 75 degrees Fahrenheit and relative humidity below 65% to prevent mold growth and reduce insect activity7. It also warns that relative humidity below 15% can cause brittleness7. Its placement advice is short:
“Store items out of damp basements, garages, and hot attics.”
U.S. National Archives and Records Administration, Storing Family Papers and Photographs7
The EPA suggests a tighter target for the whole house. It advises, if possible, keeping indoor humidity below 60%, ideally between 30 and 50%8. A humidity meter costs about $10 to $50 at hardware stores8, so a closet can be checked rather than guessed.
- Choose a closet or a high shelf in a heated room, away from exterior walls, pipes and windows.
- Use document boxes with lids, sized so folders stand upright without bending, and do not overstuff them.
- Raise every box off the floor on a shelf, so a leak or a spill does not reach the bottom row7.
- Label the short end of each box with the subject and the term it is for, so it can be read without lifting it.
- Place a humidity meter in the closet and read it at the change of season.
When a leak does reach stored paper, speed matters. The EPA advises drying water-damaged areas and items within 24-48 hours to prevent mold growth8.
Put back-stock where the family already lives, because the spare closet in a heated room protects next year’s curriculum better than the largest shelf in the garage.
Step 7: Write the Overflow Rules
Step 7 sets the rules that stop the system filling up again. They cover a full bin, the end of a term and the arrival of new curriculum. Without them, a well-sorted storage wall can drift back to mixed tiers within a term.
An overflow rule is a pre-agreed action that a full container triggers, so nobody has to decide what to do on a busy afternoon. The rules work best written down and posted inside the cabinet door.
| Trigger | Rule | Who acts |
|---|---|---|
| A child’s bin will not close | The oldest item moves to on-deck or the archive | Child, then parent |
| A new book joins the child’s shelf | One book leaves for on-deck | Child |
| New curriculum arrives | It goes straight to back-stock, labeled with its start term | Parent |
| A back-stock bin is full | No new purchases for that subject until the bin empties | Parent |
| A term ends | Keep a few work samples in the archive and recycle the rest | Parent and child |
| Material is outgrown with no younger sibling waiting | Donate or pass it on within the month | Parent |
The rule that does the most work is the full back-stock bin. It turns storage into a budget: when a bin fills, buying stops for that subject. For the desk side of the same system, the homework station plan covers desk storage, lighting and the daily reset.
Design for the reset, not just the reveal: the storage plan that survives is the one with a written answer for the day a bin overflows.
Homeschool Storage Ideas by Room Type
The seven steps apply in every home, but each space has a different limit on storage, whether that is floor area, evening family use or a shared desk. The table matches common homeschool spaces to the storage pieces that fit them best.
| Space | Main limit | Storage that fits |
|---|---|---|
| Dedicated school room | Few limits, so tiers blur | Full storage wall by tier, cabinet for adult-managed supplies, archive boxes in the closet |
| Living room corner | Family use every evening | Cabinet with doors for all tiers but the active one; cart parks inside or beside it |
| Kitchen or dining table | Meals at set times | Rolling cart for the active tier; back-stock in a hall closet |
| Bedroom nook | School and sleep share one room | Closed bins only, so school disappears at night |
| Shared home office | Adult work and school overlap | Separate shelves per user; locked drawer for adult tools |
Small rooms push storage up the wall even harder. The compact learning zone spoke covers perimeter placement and the walking path in a small space.
Pick storage by the room’s main limit before picking it by style. In a living room, the cabinet that closes is worth more than the open shelf that looks better.
Common Mistakes in Homeschool Storage
One costly mistake in homeschool storage is buying bins before sorting by tier. The others come from the same root: planning storage for the first day of school instead of the fortieth.
Storing by subject alone
Subject shelves feel logical, but they mix this week’s math book with next term’s. Sort by tier first, then by subject inside each tier.
Putting back-stock within the child’s reach
Spare workbooks on a low shelf get started early, written in, or used as scrap paper. Keep back-stock high or behind a door, and keep heavy boxes on the floor row in closed bins.
Leaving tall shelving unanchored
An empty bookcase seems steady, but a loaded one with a climbing child is a different load case. Anchor every tall unit to studs, and ask a licensed installer about any doubtful wall.
Sending paper to the garage
The garage has the most space and the worst conditions for paper. Keep curriculum in a heated room and use the garage for plastic tubs of non-paper supplies only.
What a Working Homeschool Storage System Looks Like
A working homeschool storage system passes five checks on an ordinary weekday, and once it does, further purchases are optional.
- Each child can fetch and return every active-tier item without climbing or asking.
- The rolling cart loads and unloads in a few minutes.
- Every tall unit is anchored and does not rock when pushed at the top.
- Every adult-managed container sits behind a door or above reach, with its original label.
- The back-stock closet sits in a heated room, with a humidity meter inside.
The next stretch goal is the age transition. As children grow, their reach band rises, so re-measure each autumn and move the active tier up a shelf.
Frequently Asked Questions
What are the best homeschool storage solutions for a small home?
The best homeschool storage solutions for a small home use wall height and closed cabinets instead of floor space. Keep the walking route clear: Access Board standards for public buildings set 36 inches as the minimum clear width of walking surfaces2, a useful planning target at home.
How high should homeschool shelves be for children?
Daily materials belong inside the child’s reach band. Access Board guidance for public buildings gives ages 3 and 4 a reach of 20 to 36 inches and ages 9 through 12 a reach of 16 to 44 inches2. Treat these as reference ranges and measure the actual child.
Should homeschool bookshelves be anchored to the wall?
Tall homeschool bookshelves should be anchored to the wall framing. An average of 18,673 children a year were treated in U.S. emergency departments for furniture or TV tip-overs from 1990 to 20194. The voluntary tip-over standard for clothing storage units does not cover bookcases3.
Where should homeschool back-stock be stored?
Homeschool back-stock belongs in a closet or on a high shelf inside the living area. The National Archives advises keeping stored papers below 75 degrees Fahrenheit and below 65% relative humidity7, and keeping them out of damp basements, garages and hot attics.
How should magnetic math manipulatives be stored?
Loose magnets belong in adult-managed storage, handed out per lesson. CPSC estimated 26,600 emergency-department-treated magnet ingestions from 2010 through 20215, and its magnet rule may not cover every magnetic manipulative.
Limitations and Edge Cases
- The reach ranges, path width and protrusion limit come from U.S. accessibility standards for public buildings. Homes are not required to meet them, and a specific child can fall outside any range, so measure the child.
- The humidity figures are general guidance for stored paper and for the home. No cited source sets a humidity for homeschool curriculum, and homes in very humid climates may need a dehumidifier to reach either target.
- Renters who cannot drill into walls should ask the landlord or a licensed installer about approved anchoring before loading any tall unit.
- If a child has motor, posture or sensory needs that affect reaching or lifting, ask a pediatric occupational therapist to guide shelf heights and container choices.
References
Methodology: every figure comes from an independent published source checked live on October 11, 2026. The storage tiers, overflow rules and humidity chart are planning syntheses built on those sources by the article’s author.
- National Center for Education Statistics – Homeschooled Children and Reasons for Homeschooling, Condition of Education.
- U.S. Access Board – ADA Accessibility Standards, sections 307.2, 403.5.1 and 811.3 and Advisory 308.1 on children’s reach ranges.
- Federal Register – Safety Standard for Clothing Storage Units, Consumer Product Safety Commission final rule 2023-08997, May 4, 2023.
- PubMed – Lu C, Badeti J, Mehan TJ, Zhu M, Smith GA. Furniture and television tip-over injuries to children treated in United States emergency departments. Injury Epidemiology, August 2021.
- Federal Register – Safety Standard for Magnets, Consumer Product Safety Commission final rule 2022-20200, September 21, 2022.
- U.S. Consumer Product Safety Commission – Art and Craft Safety Guide, publication 5015.
- U.S. National Archives and Records Administration – Storing Family Papers and Photographs, How to Preserve Family Archives.
- U.S. Environmental Protection Agency – A Brief Guide to Mold, Moisture and Your Home.
Conclusion
Homeschool storage works when every item has a tier, an owner and a fixed home. Active materials sit within the child’s reach, adult-managed supplies sit behind a door, and paper back-stock waits in a dry closet inside the living area. Anchored shelving, a rolling cart and written overflow rules keep the system working after the first month. Structural reasoning first, decor inspiration second.
For how storage fits the wider plan for learning areas at home, see the overview in the homeschool learning zones guide.